
PCB Component Assembly Process: A Comprehensive Guide
PCB component assembly process is a critical step in the manufacturing of electronic devices. This process involves the placement of electronic components onto the surface of the printed circuit board (PCB) and soldering them in place. The assembly process is carried out by automated machines or by hand, depending on the complexity of the circuit board and the quantity of components to be assembled.

The PCB component assembly process begins with the preparation of the circuit board. The board must be cleaned to remove any dirt or debris that may interfere with the placement of components. The board is then coated with a layer of solder paste, which is a mixture of tiny balls of solder and flux. The solder paste is applied to the board using a stencil, which ensures that the paste is applied only to the areas where components will be placed. Once the solder paste is applied, the components are placed on the board using automated pick-and-place machines or by hand. The board is then heated to melt the solder paste and bond the components to the board.
Design and Layout Planning

Design and layout planning is a crucial stage in the PCB component assembly process. It involves creating a schematic capture and PCB layout design, which are the blueprint for the final product.
Schematic Capture
Schematic capture is the process of creating a graphical representation of the electrical connections and components in the circuit. It is an essential step in the design process as it helps to identify any errors or potential issues before the PCB layout design is created.
To ensure accuracy, it is important to use a schematic capture tool that provides a comprehensive library of components and symbols. This will help to minimize errors and save time during the layout design stage.
PCB Layout Design
The PCB layout design is the physical representation of the circuit board. It involves placing the components and routing the connections to create a functional circuit.
During the layout design stage, it is important to consider factors such as signal integrity, power distribution, and thermal management. These factors can significantly impact the performance and reliability of the final product.
To ensure a successful layout design, it is important to use a PCB design software that provides advanced layout tools and design rule checking. This will help to minimize errors and ensure that the final product meets the required specifications.
In summary, the design and layout planning stage is a critical step in the PCB component assembly process. It requires careful consideration of the schematic capture and PCB layout design to ensure a functional and reliable final product.
Materials and Component Sourcing
Bill of Materials Creation
The first step in the PCB assembly process is creating a Bill of Materials (BOM). A BOM is a comprehensive list of all the components required to build a PCB. It includes the part numbers, quantities, and descriptions of each component. Creating a BOM is a critical step as it helps to ensure that all the necessary components are available and that there are no missing or incorrect parts during the assembly process.
To create a BOM, the engineer must have a thorough understanding of the PCB design and the required components. They should review the design files and identify all the components that will be needed. They should also consider any alternate components that could be used if the primary components are not available.
Supplier Selection
Once the BOM is created, the next step is to source the components. It is essential to select reliable suppliers who can provide quality components at a reasonable price. The engineer should consider the following factors when selecting suppliers:
- Quality: The supplier should provide high-quality components that meet the required specifications.
- Price: The supplier should offer competitive prices for the components.
- Lead Time: The supplier should be able to deliver the components within the required timeframe.
- Availability: The supplier should have a sufficient quantity of components in stock or be able to source them quickly.
The engineer may also consider other factors such as the supplier’s reputation, customer service, and return policies.
To ensure that the components are sourced correctly, the engineer should maintain a database of approved suppliers. They should also review the supplier’s documentation, including certificates of conformance and test reports, to ensure that the components meet the required specifications.
In conclusion, creating a BOM and selecting reliable suppliers are critical steps in the PCB component assembly process. By following these steps, the engineer can ensure that the required components are available and that the PCB is assembled correctly.
PCB Fabrication
PCB fabrication is the process of creating a printed circuit board (PCB) from a raw substrate material. The fabrication process involves several steps, including substrate manufacturing and copper patterning.
Substrate Manufacturing
The first step in PCB fabrication is substrate manufacturing. The substrate is the base material on which the copper traces and components will be mounted. The most common substrate material is fiberglass-reinforced epoxy resin, which is also known as FR-4.
During substrate manufacturing, the fiberglass and epoxy resin are combined and laminated together to form a rigid and durable substrate. The thickness of the substrate can vary depending on the application, but it typically ranges from 0.0625 inches to 0.125 inches.
Copper Patterning
After the substrate is manufactured, the next step in PCB fabrication is copper patterning. Copper is used to create the conductive traces on the PCB, which connect the various components together.
The copper patterning process involves several steps, including applying a layer of copper to the substrate, etching away unwanted copper using a chemical process, and then applying a layer of soldermask to protect the copper traces.
Overall, the PCB fabrication process is a critical step in the production of electronic devices. By following strict manufacturing processes, PCB manufacturers can create high-quality PCBs that are reliable and durable.
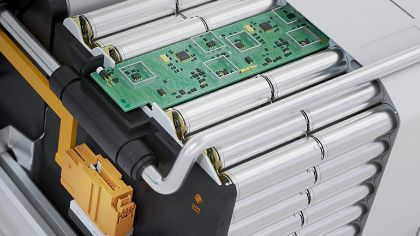
Component Placement
When it comes to PCB assembly, component placement is a crucial step that requires precision and accuracy. This step involves placing the electronic components onto the printed circuit board in their designated locations.
Solder Paste Application
Before the components can be placed, solder paste must be applied to the board. Solder paste is a mixture of tiny solder particles and flux, which is used to connect the components to the board. The paste is applied to the board using a stencil, which ensures that the paste is applied only where it is needed.
Pick and Place
Once the solder paste has been applied, the components can be placed onto the board. This is done using a pick and place machine, which picks up the components from their reels or trays and places them onto the board in their designated locations. The machine uses a camera to ensure that the components are placed accurately and with the correct orientation.
During the pick and place process, it is important to ensure that the components are placed with the correct amount of force. Too much force can damage the components, while too little force can result in a weak connection.
Overall, the component placement process is a critical step in the PCB assembly process. By ensuring that the components are placed accurately and with the correct amount of force, manufacturers can produce high-quality PCBs that meet the needs of their customers.
Soldering and Assembly
Reflow Soldering
Reflow soldering is a widely used method for attaching surface mount components to printed circuit boards (PCBs). In this process, solder paste is applied to the PCB pads, and components are placed on top of the paste. The board is then heated in a reflow oven, which melts the solder paste and creates a permanent connection between the components and the PCB.
One of the advantages of reflow soldering is its ability to create high-quality, reliable connections. This is because the solder paste is applied in a controlled manner, and the reflow process ensures that the solder is evenly distributed and forms a strong bond. Additionally, reflow soldering can be used with a wide range of component sizes and shapes, making it a versatile approach to PCB assembly.
Wave Soldering
Wave soldering is a method used for through-hole component assembly. In this process, the PCB is passed over a wave of molten solder, which creates a permanent connection between the components and the PCB. The components are held in place by a temporary adhesive or a fixture.
Wave soldering is a fast and efficient method for through-hole assembly. However, it requires careful preparation to ensure that the components are properly aligned and held in place during the process. Additionally, wave soldering is not suitable for surface mount components, which must be assembled using other methods such as reflow soldering.
In conclusion, both reflow soldering and wave soldering are important methods for PCB component assembly. Each method has its own advantages and limitations, and the choice of method depends on the specific requirements of the project. By understanding the differences between these methods, PCB assemblers can choose the best approach for their needs and ensure high-quality, reliable connections between components and PCBs.
Inspection and Quality Control
To ensure that the PCB component assembly process is successful, inspection and quality control procedures are necessary. This section will cover two important aspects of inspection and quality control: Automated Optical Inspection (AOI) and Functional Testing.
Automated Optical Inspection
AOI is a critical step in the PCB component assembly process. It involves using specialized equipment to inspect the surface of the PCB for defects and quality issues. The equipment is capable of detecting issues such as missing components, incorrect component placement, and solder defects.
During the AOI process, the PCB is scanned using high-resolution cameras that capture images of the board. The images are then analyzed by software that can detect any defects or quality issues. If a defect is detected, the PCB is flagged for further inspection or repair.
Functional Testing
Functional testing is another important step in the PCB component assembly process. It involves testing the functionality of the assembled PCB to ensure that it is working as intended. This step is typically performed using specialized testing equipment that can simulate real-world conditions.
During functional testing, the PCB is subjected to a series of tests that are designed to verify its functionality. These tests may include checking the voltage and current levels, verifying that all components are working correctly, and ensuring that the PCB can withstand the expected environmental conditions.
In conclusion, inspection and quality control are critical steps in the PCB component assembly process. By using AOI and functional testing, manufacturers can ensure that their PCBs are of high quality and meet the necessary specifications.