
PCB Components Assembly Process: A Comprehensive Guide
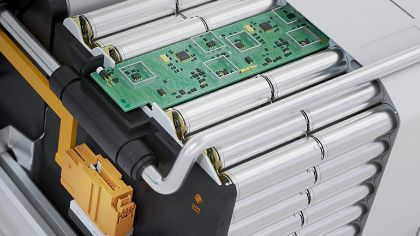
PCB components assembly process is an essential part of the manufacturing of printed circuit boards. It involves the installation of electronic components onto the board, which is then used to power various electronic devices. The process requires precision and expertise to ensure that the components are correctly placed and securely attached to the board.

The assembly process typically starts with the preparation of the board, including the application of solder paste to the designated areas. The components are then placed onto the board using automated machines or by hand, depending on the complexity of the board and the number of components required. Once the components are in place, the board is heated to melt the solder paste and create a secure connection between the components and the board.
The PCB components assembly process is crucial in ensuring the reliability and functionality of electronic devices. Quality control measures are implemented to ensure that each board is assembled correctly and meets the required specifications. With the increasing demand for smaller and more complex electronic devices, the importance of a precise and efficient PCB assembly process cannot be overstated.
PCB Design and Layout

Schematic Capture
The first step in the PCB assembly process is to create a schematic capture of the circuit design. This is done using specialized software that allows the designer to create a visual representation of the circuit. The schematic capture includes all the components and their connections, and it serves as a blueprint for the PCB layout.
PCB Layout Software
Once the schematic capture is complete, the next step is to create the PCB layout. This is done using PCB layout software that allows the designer to place the components on the board and route the connections between them. The software also includes tools for creating the necessary copper traces, vias, and other features.
Design for Assembly
Design for Assembly (DFA) is an important consideration in the PCB assembly process. DFA involves designing the PCB layout in such a way that it can be easily assembled and tested. This includes considerations such as component placement, trace routing, and the use of standard components.
To ensure that the PCB can be assembled efficiently, the designer should follow certain guidelines. For example, components should be placed close together to minimize the length of the traces between them. The PCB should also be designed with a standard grid system to ensure that components can be placed accurately.
In conclusion, the PCB design and layout process is a critical step in the PCB assembly process. By following best practices for schematic capture, PCB layout software, and DFA, designers can create PCBs that are efficient to assemble and test, while still meeting the requirements of the circuit design.
Component Sourcing
When it comes to Printed Circuit Board (PCB) assembly, sourcing the right components is critical to ensuring the final product functions as intended. In this section, we will discuss the different aspects of component sourcing that need to be considered during the assembly process.
Bill of Materials
The Bill of Materials (BOM) is a comprehensive list of all the components required for the PCB assembly process. It includes information such as the component part number, quantity, and reference designator. The BOM serves as a guide for the procurement team to source the correct components and ensure that they are available for the assembly process.
Supplier Selection
Choosing the right supplier for the components is crucial to ensure that the PCB assembly process runs smoothly. The supplier should be able to provide the required components in the required quantity and within the specified timeframe. It is important to consider factors such as the supplier’s reputation, lead time, and pricing when selecting a supplier.
Quality Assurance
The quality of the components used in the PCB assembly process is critical to the final product’s performance. To ensure that the components meet the required quality standards, the procurement team should perform a thorough quality check before accepting the components. The quality check should include a visual inspection of the components, as well as functional testing where applicable.
In conclusion, component sourcing is a critical aspect of the PCB assembly process. By following the guidelines outlined in this section, the procurement team can ensure that the right components are sourced from the right suppliers and meet the required quality standards.
Assembly Techniques
There are various techniques for assembling PCB components, each with its own advantages and disadvantages. This section will discuss three of the most common techniques: Surface-Mount Technology (SMT), Through-Hole Technology (THT), and Mixed Assembly.
Surface-Mount Technology
SMT is a popular technique that involves mounting components directly onto the surface of the PCB. This is done by placing tiny components onto the PCB’s pads and then heating the entire board to melt the solder, which attaches the components to the pads. SMT offers several advantages over THT, including smaller component sizes, higher component density, and faster assembly times. Additionally, SMT is less prone to component damage during assembly and allows for automated assembly processes.
Through-Hole Technology
THT is an older technique that involves mounting components by inserting them into holes drilled into the PCB. The components are then soldered to the PCB’s pads on the opposite side of the board. THT components are typically larger than SMT components and require more space on the board. However, THT offers better mechanical stability and is more suitable for components that require higher power or have higher mechanical stress.
Mixed Assembly
Mixed assembly is a technique that combines both SMT and THT components on the same PCB. This technique allows for the advantages of both techniques to be utilized, such as the smaller size and higher density of SMT components and the mechanical stability of THT components. However, mixed assembly can be more complex and time-consuming than using only one technique.
In conclusion, selecting the appropriate assembly technique depends on several factors, including component size, density, power requirements, and mechanical stress. By understanding the advantages and disadvantages of each technique, designers can choose the most suitable technique for their specific application.
Soldering and Reflow
Manual Soldering
Manual soldering involves using a soldering iron to melt and join together PCB components. This process requires a skilled operator who can control the temperature and timing of the soldering iron to ensure that the components are properly joined together. Manual soldering is often used for low-volume production runs or for repairs.
To ensure the best results, the operator must use the correct soldering iron tip size and shape for the component being soldered. They must also use the correct amount of solder and flux to ensure a strong and reliable joint. It is important to note that manual soldering can be time-consuming and labor-intensive, which is why it is not always the best option for high-volume production runs.
Wave Soldering
Wave soldering is a process that involves passing a PCB over a wave of molten solder to join together the components. This process is often used for high-volume production runs as it is faster and more efficient than manual soldering.
During the wave soldering process, the PCB is first cleaned and flux is applied to the components. The PCB is then passed over a wave of molten solder, which joins together the components. The PCB is then cooled and inspected for defects.
Wave soldering is a reliable and efficient process, but it does require specialized equipment and trained operators to ensure that the components are properly joined together.
Reflow Ovens
Reflow ovens are used to join together PCB components using a combination of heat and solder paste. Solder paste is applied to the PCB before the components are placed on the board. The PCB is then passed through a reflow oven, which heats the solder paste to a specific temperature to melt and join together the components.
Reflow ovens are often used for high-volume production runs as they are fast and efficient. They also produce consistent results and require minimal operator intervention. However, reflow ovens do require specialized equipment and trained operators to ensure that the components are properly joined together.
In conclusion, soldering and reflow are critical processes in the assembly of PCB components. The choice of process will depend on the volume of production and the complexity of the PCB. By using the right process and equipment, manufacturers can ensure that they produce high-quality PCBs that meet the needs of their customers.
Inspection and Testing
Visual Inspection
Visual inspection is a crucial step in the PCB components assembly process. The inspector carefully examines the assembled PCB for any defects such as missing components, incorrect placement, solder bridges, and other issues that may affect the functionality of the board. The inspector uses a magnifying glass or microscope to ensure that all components are correctly placed and soldered. Any issues found during this inspection are corrected before proceeding to the next step.
Automated Optical Inspection
Automated Optical Inspection (AOI) is a computerized process used to inspect PCBs. AOI machines use high-resolution cameras to capture images of the PCB and compare them to a pre-determined standard. This process is fast and efficient and can detect defects such as missing components, incorrect placement, and solder bridges. AOI machines are especially useful for detecting issues that may be difficult to spot during visual inspection.
Functional Testing
Functional testing is the final step in the PCB components assembly process. This step involves testing the functionality of the PCB to ensure that it meets the required specifications. The PCB is connected to a test fixture that simulates the actual operating conditions of the device. The test fixture checks the functionality of the PCB by sending signals to the board and analyzing the output. Any issues found during this testing are corrected before the PCB is shipped to the customer.
In conclusion, inspection and testing are critical steps in the PCB components assembly process. Visual inspection, automated optical inspection, and functional testing are all necessary to ensure that the PCB meets the required specifications and functions correctly. These steps help to identify and correct any defects before the PCB is shipped to the customer, ensuring the highest quality product possible.