
LG Washer PCB Assembly: Understanding the Basics
LG Washer PCB Assembly: A Comprehensive Guide

LG is a popular brand known for its innovative and reliable home appliances. One of its most popular products is the LG washer, which is widely used in households and commercial establishments. The LG washer is designed to provide efficient and effective cleaning, but like any other appliance, it requires maintenance and occasional repair. One of the critical components of the LG washer is the PCB assembly, which is responsible for controlling the various functions of the washer.
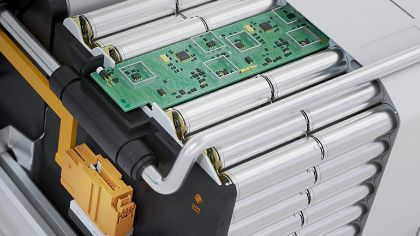
The PCB assembly is a complex circuit board that contains multiple electronic components, such as resistors, capacitors, transistors, and diodes. It is responsible for controlling the various functions of the washer, such as the water level, temperature, spin speed, and wash cycle. The PCB assembly is a critical component of the LG washer, and any malfunction can cause the washer to stop working or perform poorly. In this article, we will provide a comprehensive guide to the LG washer PCB assembly, including its functions, common issues, and troubleshooting tips.
Overview of LG Washer PCB Assembly

LG washer PCB assembly is an essential component of modern washing machines. It is responsible for controlling and managing various functions of the washing machine, including water level, temperature, and cycle time. The PCB assembly is a complex system that consists of several key components that work together to ensure the smooth operation of the washing machine.
Function and Importance
The main function of the LG washer PCB assembly is to control and manage the various functions of the washing machine. It is responsible for regulating the water level, temperature, and cycle time of the machine. The PCB assembly also monitors the washing machine’s performance and makes adjustments as necessary to ensure optimal performance.
The importance of the LG washer PCB assembly cannot be overstated. It is a critical component of the washing machine that ensures the machine operates smoothly and efficiently. Without the PCB assembly, the washing machine would not be able to function properly, and the user would not be able to enjoy the benefits of a clean and fresh laundry.
Key Components
The LG washer PCB assembly consists of several key components that work together to ensure the smooth operation of the washing machine. These components include:
- Microcontroller: This is the brain of the PCB assembly. It receives and processes input from various sensors and controls the various functions of the washing machine.
- Sensors: The sensors in the PCB assembly monitor various aspects of the washing machine, such as water level, temperature, and cycle time.
- Power Supply: The power supply provides the necessary power to the PCB assembly to ensure it can operate efficiently.
- Memory: The memory in the PCB assembly stores data and settings related to the washing machine’s operation.
In conclusion, the LG washer PCB assembly is a critical component of modern washing machines. It is responsible for controlling and managing various functions of the washing machine, and without it, the machine would not be able to function properly. The PCB assembly consists of several key components that work together to ensure the smooth operation of the washing machine.
Installation Guide
Preparation and Safety
Before starting the installation process of the LG washer PCB assembly, it is essential to take some safety precautions. Firstly, ensure that the power supply to the washer is turned off and unplugged from the power source. This will prevent any electrical shock or short-circuiting of the PCB assembly.
Secondly, make sure that the installation area is clean and dry. Any moisture or debris can cause damage to the PCB assembly, leading to malfunctioning of the washer. It is also advisable to wear protective gear such as gloves and safety glasses during the installation process.
Step-by-Step Installation Process
The following steps outline the installation process of the LG washer PCB assembly:
- Remove the washer’s top panel by unscrewing the screws located at the back of the panel.
- Locate the PCB assembly, which is usually located at the top of the washer. Carefully detach the wiring harnesses and connectors from the old PCB assembly.
- Remove the old PCB assembly by unscrewing the screws that hold it in place. Take note of the screw locations as they will be needed during the installation of the new PCB assembly.
- Install the new PCB assembly by aligning it with the screw holes and securing it with the screws removed in step 3.
- Reconnect the wiring harnesses and connectors to the new PCB assembly, ensuring that they are correctly aligned and securely fastened.
- Replace the washer’s top panel by screwing it back in place.
- Turn on the power supply to the washer and test the functionality of the new PCB assembly.
By following these simple steps, the LG washer PCB assembly can be installed safely and efficiently. It is important to note that any deviation from these instructions may result in damage to the washer or injury to the installer.
Troubleshooting Common Issues
Diagnostic Procedures
When troubleshooting issues with the LG washer PCB assembly, it is important to follow a systematic diagnostic procedure to identify the root cause of the problem. The following steps can be used to diagnose issues with the PCB assembly:
- Check for power supply issues: Ensure that the washer is receiving power and that the power outlet is functioning correctly.
- Check for loose connections: Inspect the PCB assembly for any loose connections or damaged wires.
- Check for faulty components: Use a multimeter to test the various components on the PCB assembly for faults.
- Check for error codes: The LG washer PCB assembly is equipped with an error code display that can be used to identify specific issues with the unit.
Common Faults and Solutions
The following are some common issues that may arise with the LG washer PCB assembly and their corresponding solutions:
- No power: If the washer is not receiving power, check the power supply and the power cord for any damage. If the power supply and cord are functioning correctly, the issue may be with the PCB assembly or the control board.
- Error codes: If an error code is displayed on the PCB assembly, refer to the user manual to identify the specific issue and corresponding solution.
- Faulty components: If a specific component on the PCB assembly is found to be faulty, it will need to be replaced.
- Loose connections: If a loose connection is identified, it should be tightened or replaced as necessary.
By following these diagnostic procedures and addressing common faults, issues with the LG washer PCB assembly can be identified and resolved quickly and efficiently.
Maintenance and Care
Cleaning Guidelines
To ensure the longevity and optimal performance of your LG washer PCB assembly, it is essential to keep it clean and free of debris. Regular cleaning can also prevent the buildup of dirt and grime that can cause damage to the components of the assembly.
To clean the PCB assembly, gently wipe it down with a soft, dry cloth. Avoid using any harsh chemicals or abrasive materials that can scratch or damage the surface. If necessary, a mild detergent solution can be used to remove stubborn stains, but it should be wiped away immediately with a damp cloth and then dried thoroughly.
Periodic Inspection and Service
In addition to regular cleaning, periodic inspection and service are also important for the proper maintenance of your LG washer PCB assembly. It is recommended to have a professional technician perform a thorough inspection and service every six months.
During the inspection, the technician will check for any signs of wear or damage to the components of the assembly. They will also ensure that all connections are secure and that there are no loose or damaged wires. If any issues are found, they will be repaired or replaced as necessary to ensure that the assembly is functioning properly.
By following these simple maintenance and care guidelines, you can ensure that your LG washer PCB assembly remains in top condition for years to come.
Technical Specifications
Compatibility and Models
The LG Washer PCB Assembly is compatible with a range of LG washing machine models, including but not limited to WM3670HWA, WM4370HKA, WM9000HVA, and WM9500HKA. It is important to note that the PCB assembly must be specifically matched to the model of the washing machine to ensure proper functionality.
Electrical and Physical Parameters
The LG Washer PCB Assembly has the following electrical and physical parameters:
- Input Voltage: 120V AC
- Frequency: 60Hz
- Maximum Current: 10A
- Dimensions: 7.5 x 3.5 inches
- Weight: 0.5 lbs
The PCB assembly is designed to regulate and control the various electrical components of the washing machine, including the motor, pump, and water inlet valves. It is important to ensure that the electrical parameters of the PCB assembly match those of the washing machine to avoid damage to the components.
In terms of physical parameters, the PCB assembly is compact and lightweight, making it easy to install and replace. Its small size allows it to fit easily within the washing machine’s control panel.
Overall, the LG Washer PCB Assembly is a reliable and essential component in ensuring the proper functioning of LG washing machines. Its compatibility and electrical and physical parameters make it a suitable replacement part for a range of LG washing machine models.